Embedding Machine Learning Models to Web Apps (Part-1)
 f
f
The
best way to learn data science is by doing it, and there’s no other
alternative . From this post, I am going to reflect my learning on how I
developed a machine learning model, which can classify movies reviews
as positive or negative , and how I embed this model to a Python Flask
web application. The ultimate goal is to sail through an end to end
project. I firmly believe at the end of this post, you’ll be equipped
with all the necessary skill that need to embed an ML model to a web
application. I came across this end to project on the book, “Python Machine Learning: Machine Learning and Deep Learning with Python, scikit-learn, and TensorFlow, 2nd Edition”[1]
by Sebastian Raschka and Vahid Mirjalili. I found this book as a great
investment to my data science journey and I encourage you to tryout this
book.
Kindly note that I am not going in discussing about the theory and concepts in details. To keep this post simple and easy to understand, I’ll provide explanations in nutshell and I’ll share links, so that you can read more on the concepts and theories when time permits. My recommendation is to follow this post from beginning to end and re-visit the new concepts in the second phase of your reading.
Buckle up now, it’s going to be an amazing journey :D
This post has two main parts
- Develop movie reviews classifier (this post)
- Develop Python Flask web application and integrate movie review classifier (will release soon!)
Develop movie reviews classifier

I set up my developer environment in Paperspace which is a cloud infrastructure provider (may be there are other uses, but I only use as an PaaS),
who provides GPU based computation power to develop machine learning
and deep learning models. I created a separate project folder,
“Sentiment-Analysis” in a location I selected. This is the root
directory of the project.
Download movie reviews data
First
let’s go ahead and download the required movie data. I created a
separate file ‘download_data.ipynb’. This will download and extract
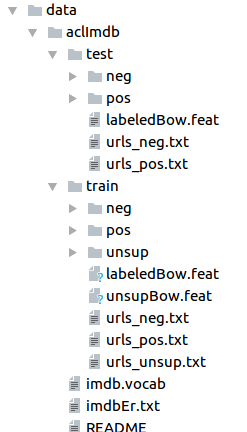
movie reviews to the folder ‘data’. When you navigate inside ‘data’
folder you’ll be able to see a folder named ‘acllmdb’. Inside ‘acllmdb’
folder, there are ‘train’ and ‘test’ folders. Both ‘train’ and ‘test’
folder contains two sub-folders named ‘pos’, which contains positive
reviews and ‘neg’, which contains negative reviews(Image[1]).
You’ll
note that these reviews in the ‘pos’ and ‘neg’ folders are in the form
of text files. For us to do data processing and manipulation easily, our
next step is to create a Python Pandas data frame.
Create Pandas data frame from text files
Above
script creates a Pandas data-frame ‘df’ which contains the movie
reviews from the text files from both ‘pos’ and ‘neg’ sub-directories in
both ‘train’ and ‘test’ folder (this step will take around 10–20
minutes depending on the performance of your PC). If the movie review is
positive, we flagged the sentiment as ‘1’ and if it is negative, we
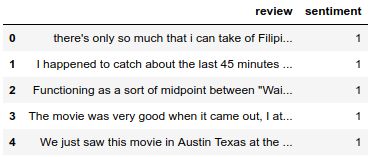
flagged the sentiment as ‘0’. In our data-frame ‘df’ we’ve two columns,
‘review’ column, which contains the review as text strings and,
‘sentiment’ column, which contains the sentiment of the review as ‘1’ or
‘0’ depending on the positiveness and the negativeness of the
sentiment. Image[2] contains the first five rows of the data frame ‘df’.
In
Image[2], we can only see the movie reviews which are positive. The
reason is that, when we were creating the data-frame, the function
arranged reviews in a sorted manner. For us to do better and useful data
manipulations, we need to randomize the order of the movie reviews
(i.e. we should see ‘0’s and ‘1’s in an uneven unsorted manner). To
achieve this we can make use of in built functions ‘permutation’ and
‘random’ of NumPy library.
Randomize data-frame and save as a CSV file
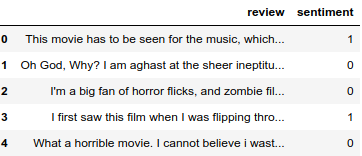
As you’ll see in Image[3], now we’ve a randomized data frame and we’ve saved the data to a csv file which named as ‘movie_data.csv’.
Cleaning text data
The
‘review’ in our data frame has text. It is extremely important to look
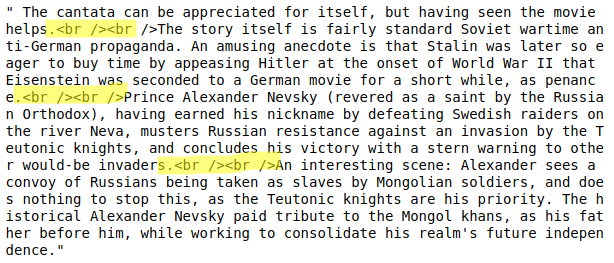
at these text very carefully. Let’s go ahead and visualize the last 999
characters from the data frame that we prepared in the above step.
It
is apparently clear that ‘review’ column contains HTML mark-up. These
mark-up does not add any useful insight to reviews. So, as a part of
text cleaning process, we have to make sure that we remove these
unwanted mark up before we use these reviews to develop the model.
While
HTML mark-up does not contain much useful semantics, punctuation marks
can represent useful, additional information in NLP context. For
simplicity we are going to remove punctuation marks except for emoticons
such as :) since these emoticons are certainly useful for semantic
analysis. We will use Python’s regular expressions (regex) to carryout this task.
These
reviews are huge chunk of words. For us to analyze reviews, we need to
split these reviews in to individual elements. This process is know as “tokenization”[2] in the NLP context. There are various techniques to tokenize a given text string. The simplest way is to use split()
in built function in Python. Given below is a simple illustration of
using split() function to tokenize set of strings to their individual
elements as shown in Image[5].

In
Image[5] you can see that we’ve successfully tokenize the text to it’s
individual elements. In the resulted output, we can see that the words
‘running’, and ‘run’. In NLP, there’s a technique to generate words into
their root form. This technique is called “word stemming”[3]. “Porter Stemmer”[4]
is quite popular among researchers in the NLP domain. In the below code
segment you can see how we can use NLTK package’s PorterStemmer to
obtain the root form of words (Image[6).

In this project we are not going to look at the root form of the words. The reason is, it’s been proved that it’s not going to add a significant improvement to the model that we are going to build. For the purpose of completeness of this post, I shared this information with you.
Another vital concept in the data cleaning and pre-processing step is the concept known as “stop word removal”.
“stop words” are the words that are commonly occur in all forms of
texts and probably bear no useful information. Few ‘stop words’ are, is, and, has, are, have, like…
Stop word removal makes our text processing mechanism efficient as it
reduces the number of words we need to analyze. Python NLTK provides an
efficient mechanism to remove ‘stop words’ from a given text corpus. You can refer the below code snippet and Image[7] to get an understanding on the mechanism of stop words removal.

Note: In the above code snippet we used the ‘tokenizer_porter’ function which was defined in the previous code snippet.
As shown in the Image[7], the package ‘stopwords’ have removed the mostly occurring words such as ‘a’, ‘and’.
This will reduce the size of our ‘bag of words’ (which will illustrate
later in this post), hence make the computation much efficient.
By now, you are aware of number of important steps in cleaning text data.
- remove unwanted HTML mark-up (via regular expressions)
- tokenization(via Python split() method)
- stemming (eg. Porter Stemmer)
- stop word removal (via NLTK stopwords)
Making movie reviews classifier
With
this background knowledge now we can go ahead and develop the sentiment
classifier. We are going to apply the above steps (except for stemming)
to our created movie_data.csv file.
There
are two approaches to develop the classifier. One is to make use of the
entire data set at once or in other words read the whole movie_data.csv
file at once, create training and test set and fit the model. The
drawback of this approach is that, we need to have a high performing
PC/computational power. Even though I used Paperspace
while trying out this tutorial, it took me almost two hours to
construct my classifier with this approach. It is a very cumbersome
experience. So, in this post I’m going ahead with the second approach.
When
working with bigger volumes of data, machine learning practitioners use
online learning algorithms. Similarly, in our case we are also going to
use one of the online learning algorithm known as “out-of-core learning”[5].
In very simple terms, this is where we use a portion of data set at a
given time and create the model from this portion of data. We are going
to update the model with the each new data portion what we feed. By
following this approach we can easily construct our model with a
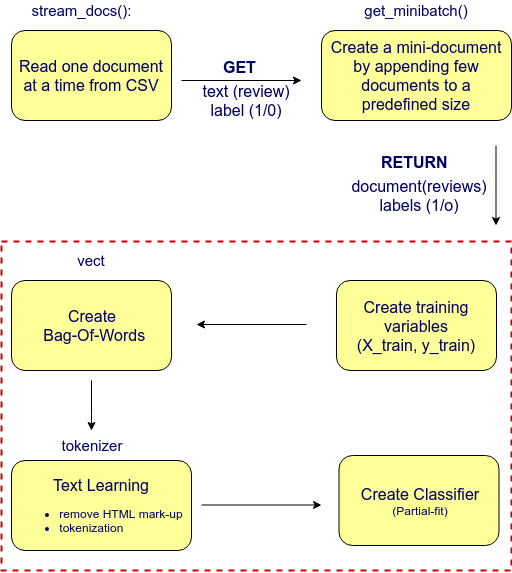
reasonable time frame. Also, we are going to define series of functions
to perform followings :
- stream_docs — read_csv (one document at a time)
- get_minibatch — create smaller sized document by appending documents
and
finally create the classifier with the use of above two functions. You
may refer to Image[8] and the code snippet provided below to get more
understanding about the classifier construction process.
This
is all what you need to create the movie classifier. Perhaps this might
seem bit complicated now, so let me walk you through the code. You may
refer Image[8] as necessary.
According
to Image[8], our first step is to read the csv file we created at the
very beginning. In the above code snippet line #16 reads the csv file.
It reads one row (document) at a time and this document then passed down
to (line 53) get_minibatch()
function to create a mini document. We create a mini document until the
mini document’s size reach 1000 (line #53). Once this mini batch
created inside the get_minibatch()
function, it returns the mini batch for further processing (from line
#36 to line #53). We use this mini batch and create training set
variables X_train and y_train.
This X_train variable is then passed down to create the bag of words (line #56). Since we are using out-of-core learning approach we’ve used scikit-learn’s HashingVectorizer. HashingVectorizer is responsible in creating the bag of words. While creating the bag of words, it will do pre-processing over the X_train, which
contains the movie reviews, and will remove unnecessary HTML mark-up
while removing stop words (or frequently occuring words which do not add
any value to our text corpus such as ‘a’, ‘like’ ‘is’ etc.) (line #49 and line #38–44).
We initialized HashingVectorizer with tokenizer funciton and set the number of features to 2**21. Furthermore, we reinitialized a logistic regression classifier by setting the loss parameter of the SGDClassifier to ‘log’. The reason to choose a large number of features in HashingVectorizer is to reduce the chance of causing hash collisions while increasing the number of coefficients in the logistic regression model.
Using the for
loop (line #52) we iterated over 45 mini-batches of documents where
each mini batch consists of 1000 documents. Having completed the
incremental learning process, we’ll use 5000 documents to evaluate the
performance of our model. Below I have given the code snippet with
respect to the test set generation and accuracy calculation. It is
pretty much self explanatory :) (you may refer the above detailed
explanation to deepen your understanding).

We
can see that our model has produced an accuracy of 86.7%, which is
fairly okay. By now, we have completed the most important step, next
step is to save this model for a later reference. Otherwise we need to
perform all these steps again to come up to this point. Please do keep your current Python session open.
PS: Our csv file contains 50K records, we use 45K as the training set and 5K as the test set. You can use Pandas “info” function to see the number of records in our csv.
It’s
going to be a pretty hectic task for us to train our model every we
shut down our Python session. So we are going to save the classifier we
trained and built. For this purpose we use Python’s in-built pickle
module which allows us to serialize and deserialize Python objects to
compact byte code. We can straight away reload these objects when we
want to classify new samples.
In the above code segment, we created a folder named ‘movieclassifier’ and ‘pkl_objects’ sub-directory to save serialized Python objects. What ‘dump’ method does is, it serialize the trained logistic regression model as well as ‘stop word’ set from NLTK library. I encourage you to read Python pickle documentation[6] to understand more about the package (if I am to explain here, it’s going to be another blog post :D)
Our
next step is to create a new Python script which we can use to import
the vectorizer into the existing Python session. Let’s go ahead and
create a new Python script, vectorizer.py in the movieclassifier directory that we created in the previous step.
Now,
at this point, we should be able to use the Python serialized objects
that we created, even from a new Python session (the hassle of training
is no longer going to be there ! YaY!!!). Let’s go ahead and test.
Navigate to the ‘movieclassifier’
folder. Stop your current Python session. Let’s start a new Python
session and see if we can load our model from the hard disk. Fingers
crossed !!!
Above
code segment is responsible for loading the vectorizer we created and
to unpicle the classifier. Now we are in a position to use these objects
and pre-process document samples and make predictions about their
sentiment. For example, let’s try to check if “I love this movie”, classifies as positive or negative.

Awesome!
It seems that our model is working correctly. We are in a position to
integrate this machine learning model with the web application that we
are going to develop. And that is the end of the first part of this two
part series.
Develop Python Flask web application
This is going to be the “Part-2”
of this post. I encourage you to get familiar with Python Flask web
application development. A decent amount of Python Flask is fairly
enough to follow the second part of this post. If you are a newbie, you
can check Flask Web App Development series by Traversy Media.
Thanks
a great deal for your interest in reading this article. Please do give
this article a round of applauds, leave your comments and feedback, I
always appreciate and welcome your views. If you found this article
useful, go ahead and share with your friends :D
Courtesy: I would like to offer an immense gratitude to Sebastian Raschka and Vahid Mirjalili. I learnt a ton from them and still learning. I never thought books can be a great resource to learn programming as I was heavily rely on online video tutorials. Now I feel, books too are a great way of learning programming and it takes a huge effort in producing a book. You can do highlight, make your own notes while learning. That’s a big plus point, so spending money of a book that you like is really a big time investment.
References:
[1] https://www.amazon.com/Python-Machine-Learning-scikit-learn-TensorFlow/dp/1787125939
[2]https://nlp.stanford.edu/IR-book/html/htmledition/tokenization-1.html
[3]https://nlp.stanford.edu/IR-book/html/htmledition/stemming-and-lemmatization-1.html
[4]http://snowball.tartarus.org/algorithms/porter/stemmer.html
[5]https://simplyml.com/hunt-for-the-higgs-boson-using-out-of-core-machine-learning/
[6]https://docs.python.org/3/library/pickle.html
https://towardsdatascience.com/embedding-machine-learning-models-to-web-apps-part-1-6ab7b55ee428
Comments
Post a Comment