Object detection and tracking in PyTorch
Detecting multiple objects in images and tracking them in videos
In my previous story, I went over how to train an image classifier in PyTorch,
with your own images, and then use it for image recognition. Now I’ll
show you how to use a pre-trained classifier to detect multiple objects
in an image, and later track them across a video.
What’s
the difference between image classification (recognition) and object
detection? In classification, you identify what’s the main object in the
image and the entire image is classified by a single class. In
detection, multiple objects are identified in the image, classified, and
a location is also determined (as a bounding box).
Object Detection in Images
There are several algorithms for object detection, with YOLO and SSD among the most popular. For this story, I’ll use YOLOv3. I won’t get into the technical details of how YOLO (You Only Look Once) works — you can read that here — but focus instead of how to use it in your own application.
So let’s jump into the code! The Yolo detection code here is based on Erik Lindernoren’s implementation of Joseph Redmon and Ali Farhadi’s paper. The code snippets below are from a Jupyter Notebook you can find in my Github repo. Before you run this, you’ll need to run the
download_weights.sh script in the config folder to download the Yolo weights file. We start by importing the required modules:from models import * from utils import *
import os, sys, time, datetime, random
import torch
from torch.utils.data import DataLoader
from torchvision import datasets, transforms
from torch.autograd import Variable
import matplotlib.pyplot as plt
import matplotlib.patches as patches
from PIL import Image
Then we load the pre-trained configuration and weights, as well as the class names of the COCO dataset on which the Darknet model was trained. As always in PyTorch, don’t forget to set the model in
eval mode after loading.config_path='config/yolov3.cfg' weights_path='config/yolov3.weights' class_path='config/coco.names' img_size=416 conf_thres=0.8 nms_thres=0.4
# Load model and weights
model = Darknet(config_path, img_size=img_size)
model.load_weights(weights_path)
model.cuda()
model.eval()
classes = utils.load_classes(class_path)
Tensor = torch.cuda.FloatTensor
There
are also a few pre-defined values above: The image size (416px
squares), confidence threshold and the non-maximum suppression
threshold.
Below
is the basic function that will return detections for a specified
image. Note that it requires a Pillow image as input. Most of the code
deals with resizing the image to a 416px square while maintaining its
aspect ratio and padding the overflow. The actual detection is in the
last 4 lines.
def detect_image(img):
    # scale and pad image
    ratio = min(img_size/img.size[0], img_size/img.size[1])
    imw = round(img.size[0] * ratio)
    imh = round(img.size[1] * ratio)
    img_transforms=transforms.Compose([transforms.Resize((imh,imw)),
         transforms.Pad((max(int((imh-imw)/2),0),
              max(int((imw-imh)/2),0), max(int((imh-imw)/2),0),
              max(int((imw-imh)/2),0)), (128,128,128)),
         transforms.ToTensor(),
         ])
    # convert image to Tensor
    image_tensor = img_transforms(img).float()
    image_tensor = image_tensor.unsqueeze_(0)
    input_img = Variable(image_tensor.type(Tensor))
    # run inference on the model and get detections
    with torch.no_grad():
        detections = model(input_img)
        detections = utils.non_max_suppression(detections, 80,
                        conf_thres, nms_thres)
    return detections[0]
Finally,
let’s put it together by loading an image, getting the detections, and
then displaying it with the bounding boxes around detected objects.
Again, most of the code here deals with scaling and padding the image,
as well as getting different colors for each detected class.
# load image and get detections
img_path = "images/blueangels.jpg"
prev_time = time.time()
img = Image.open(img_path)
detections = detect_image(img)
inference_time = datetime.timedelta(seconds=time.time() - prev_time)
print ('Inference Time: %s' % (inference_time))
# Get bounding-box colors
cmap = plt.get_cmap('tab20b')
colors = [cmap(i) for i in np.linspace(0, 1, 20)]
img = np.array(img)
plt.figure()
fig, ax = plt.subplots(1, figsize=(12,9))
ax.imshow(img)
pad_x = max(img.shape[0] - img.shape[1], 0) * (img_size / max(img.shape))
pad_y = max(img.shape[1] - img.shape[0], 0) * (img_size / max(img.shape))
unpad_h = img_size - pad_y
unpad_w = img_size - pad_x
if detections is not None:
    unique_labels = detections[:, -1].cpu().unique()
    n_cls_preds = len(unique_labels)
    bbox_colors = random.sample(colors, n_cls_preds)
    # browse detections and draw bounding boxes
    for x1, y1, x2, y2, conf, cls_conf, cls_pred in detections:
        box_h = ((y2 - y1) / unpad_h) * img.shape[0]
        box_w = ((x2 - x1) / unpad_w) * img.shape[1]
        y1 = ((y1 - pad_y // 2) / unpad_h) * img.shape[0]
        x1 = ((x1 - pad_x // 2) / unpad_w) * img.shape[1]
        color = bbox_colors[int(np.where(
             unique_labels == int(cls_pred))[0])]
        bbox = patches.Rectangle((x1, y1), box_w, box_h,
             linewidth=2, edgecolor=color, facecolor='none')
        ax.add_patch(bbox)
        plt.text(x1, y1, s=classes[int(cls_pred)],
                color='white', verticalalignment='top',
                bbox={'color': color, 'pad': 0})
plt.axis('off')
# save image
plt.savefig(img_path.replace(".jpg", "-det.jpg"),
                  bbox_inches='tight', pad_inches=0.0)
plt.show()
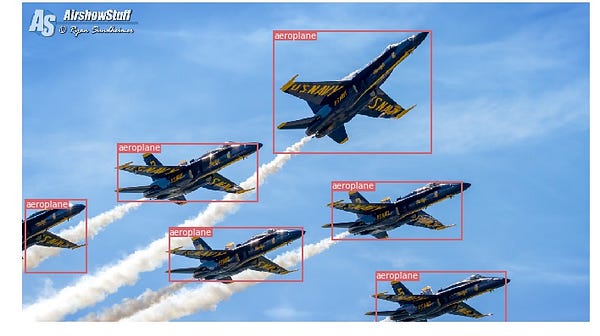
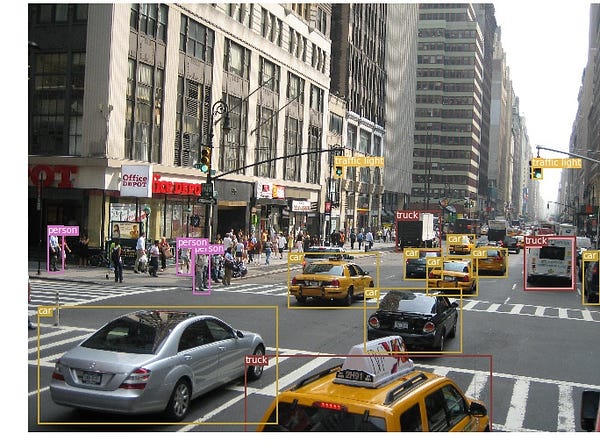
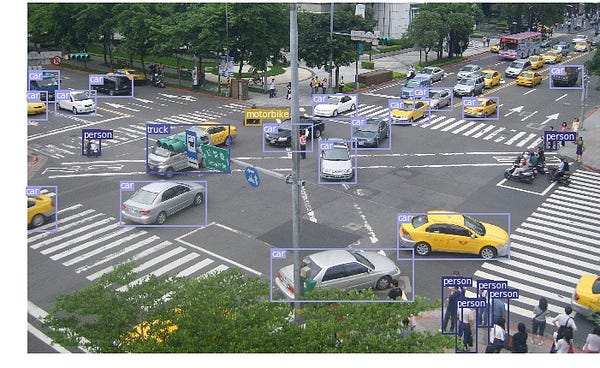
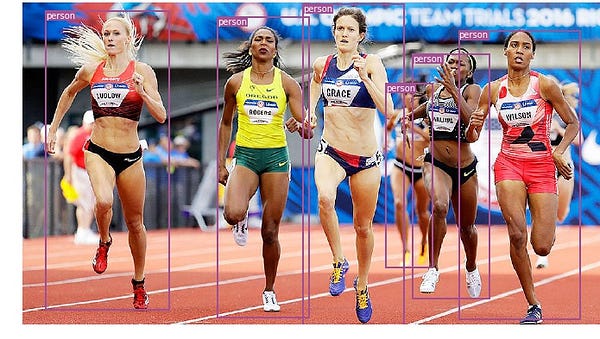
You can put together these code fragments to run the code, or download the notebook from my Github. Here are a few examples of object detection in images:
Object Tracking in Videos
So
now you know how to detect different objects in an image. The
visualization might be pretty cool when you do it frame by frame in a
video and you see those tracking boxes moving around. But if there are
multiple objects in those video frames, how do you know if an object in
one frame is the same as one in a previous frame? That’s called object
tracking, and uses multiple detections to identify a specific object
over time.
There are several algorithms that do it, and I decided to use SORT, which is very easy to use and pretty fast. SORT (Simple Online and Realtime Tracking) is a 2017 paper by Alex Bewley, Zongyuan Ge, Lionel Ott, Fabio Ramos, Ben Upcroft which proposes using a Kalman filter
to predict the track of previously identified objects, and match them
with new detections. Author Alex Bewley also wrote a versatile Python implementation that I’m gonna use for this story. Make sure you download the Sort version from my Github repo since I had to make a few small changes to integrate it in my project.
Now
on to the code, the first 3 code segments will be the same as in the
single image detection, since they deal with getting the YOLO detections
on a single frame. The difference comes in the final part where for
each detection we call the Update function of the Sort object in order
to get references to the objects in the image. So instead of the regular
detections from the previous example (which include the coordinates of
the bounding box and a class prediction), we’ll get tracked objects
which, besides the parameters above, also include an object ID. Then we
display the almost the same way, but adding that ID and using different
colors so you can easily see the objects across the video frames.
I also used OpenCV
to read the video and display the video frames. Note that the Jupyter
notebook is quite slow in processing the video. You can use it for
testing and simple visualizations, but I also provided a standalone
Python script that will read the source video, and output a copy with
the tracked objects. Playing an OpenCV video in a notebook is not easy,
so you can keep this code for other experiments.
videopath = 'video/intersection.mp4'
%pylab inline
import cv2
from IPython.display import clear_output
cmap = plt.get_cmap('tab20b')
colors = [cmap(i)[:3] for i in np.linspace(0, 1, 20)]
# initialize Sort object and video capture
from sort import *
vid = cv2.VideoCapture(videopath)
mot_tracker = Sort()
#while(True):
for ii in range(40):
    ret, frame = vid.read()
    frame = cv2.cvtColor(frame, cv2.COLOR_BGR2RGB)
    pilimg = Image.fromarray(frame)
    detections = detect_image(pilimg)
    img = np.array(pilimg)
    pad_x = max(img.shape[0] - img.shape[1], 0) *
            (img_size / max(img.shape))
    pad_y = max(img.shape[1] - img.shape[0], 0) *
            (img_size / max(img.shape))
    unpad_h = img_size - pad_y
    unpad_w = img_size - pad_x
    if detections is not None:
        tracked_objects = mot_tracker.update(detections.cpu())
        unique_labels = detections[:, -1].cpu().unique()
        n_cls_preds = len(unique_labels)
        for x1, y1, x2, y2, obj_id, cls_pred in tracked_objects:
            box_h = int(((y2 - y1) / unpad_h) * img.shape[0])
            box_w = int(((x2 - x1) / unpad_w) * img.shape[1])
            y1 = int(((y1 - pad_y // 2) / unpad_h) * img.shape[0])
            x1 = int(((x1 - pad_x // 2) / unpad_w) * img.shape[1])
            color = colors[int(obj_id) % len(colors)]
            color = [i * 255 for i in color]
            cls = classes[int(cls_pred)]
            cv2.rectangle(frame, (x1, y1), (x1+box_w, y1+box_h),
                         color, 4)
            cv2.rectangle(frame, (x1, y1-35), (x1+len(cls)*19+60,
                         y1), color, -1)
            cv2.putText(frame, cls + "-" + str(int(obj_id)),
                        (x1, y1 - 10), cv2.FONT_HERSHEY_SIMPLEX,
                        1, (255,255,255), 3)
    fig=figure(figsize=(12, 8))
    title("Video Stream")
    imshow(frame)
    show()
    clear_output(wait=True)
After
you play with the notebook, you can use the regular Python script both
for live processing (you can take input from a camera) and to save
videos. Here’s a sample of videos I generated with this program.
And
that’s it, you can now try on your own to detect multiple objects in
images and to track those objects across video frames. You can also do
more research on YOLO and find out how to train a model with your own
images.
Chris Fotache is an AI researcher with CYNET.ai
based in New Jersey. He covers topics related to artificial
intelligence in our life, Python programming, machine learning, computer
vision, natural language processing and more.


Comments
Post a Comment